Switzerland is definitely one of our favorite countries in Europe. During winter, it has excellent snow and ski areas, great cheese fondue and after-ski activities. The landscape in summer, however, is dramatically different and we must admit that we love the views even more during the summer months. Although climbing the Alpine mountains can be strenuous, the hikes we describe, will take you to the most photogenic places in the world. In this blog post, we give you an overview of the best photogenic spots and most instagrammable places in Switzerland, more specifically, in the Saas valley. We’ll also share some mountain photography tips so you are able to maximize your likes on your Instagram account.
Table of Contents
Easy to reach Instagram spots
We love to hike, so some of our most beloved photogenic spots in the Saas valley demand sturdy hiking boots and some effort. But let’s start with the easy to reach instagrammable places. Ideal to go to when you are still tired of the hike the day before, or just want to enjoy the views without too much effort.
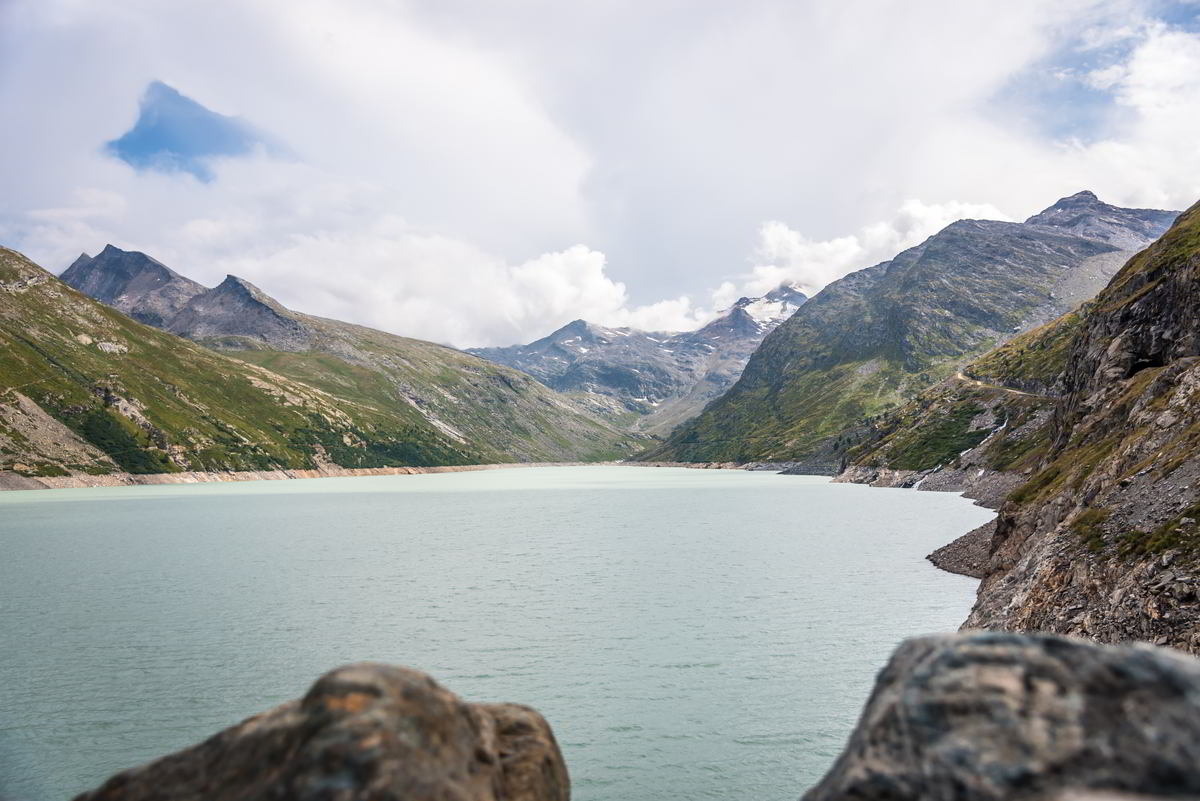
1. The ‘Mattmark lake’
Where the Saas valley ends at the Mattmark dam, the landscape gets more rugged. The Mattmark dam is the biggest earthen dam all over Europe and contains 10 million cubic meters of water. And thanks to this dam, the valley is provided with enough sustainable electricity. But the views over the glacier blue water, surrounded by the high Alpine mountain peaks make this dam definitely worth a visit, especially if you like landscape photography.
How to get to Mattmark?
Easy to reach, as the valley road ends in front of the Mattmark lake. Just take the only road from Saas-Grund to Saas-Almagell and keep on driving. If you take your own car, there are a lot of (free) parking spots in front of the dam. Just a 10 minute hike, and you are at the top of the dam, looking over the lake. If you are staying in the Saas valley, your accommodation provides you with the ‘Burgervignette’. This vignette allows you to take all the busses in the valley for free. There is a bus going to Mattmark every half an hour but make sure not to miss the last bus (around 6.30 pm) going back to Saas-Almagell and Saas-Grund!
Photography tips for Mattmark
- A ND filter during (too) sunny days is excellent to prevent blown-out photos and to give the lake a ‘pudding like’ look.
- Putting an object in front of your frame can accentuate the largeness of the lake and the mountains.
- You don’t always need sunny weather. When we visited the lake, there was a lot of mist that cleared up after a while. It allowed us to make some interesting, mysterious pictures.
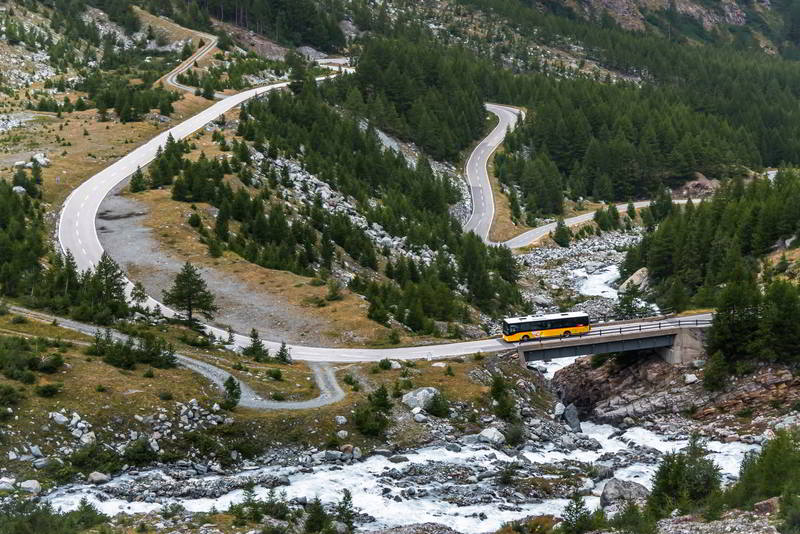
2. The road from Mattmark to Saas-Almagell
Are you also a fan of photographs where winding roads are pictured, against a magnificent background? Then you will probably like this easy to reach Instagram hotspot in Switzerland. When driving back from Mattmark back to Saas-Almagell, you have some hairpin bends. Just before the hairpin bends start, there is a little bit of space next to the road to park your car. From there, you have a perfect view over the windy road.
How to get there?
Just take the road to Mattmark (see directions above). When you are almost at the dam, you will see an old tunnel on the left. From there, you have a nice view over the hairpin bends. You can also take the bus to Mattmark and walk until the old tunnels (about a 15-minute walk one-way).
Photography tip
- To emphasize the size of the hairpin bends, it is always a good idea to have a car driving on the road. And with the green of the trees, the yellow Post bus is the perfect subject in your photo.
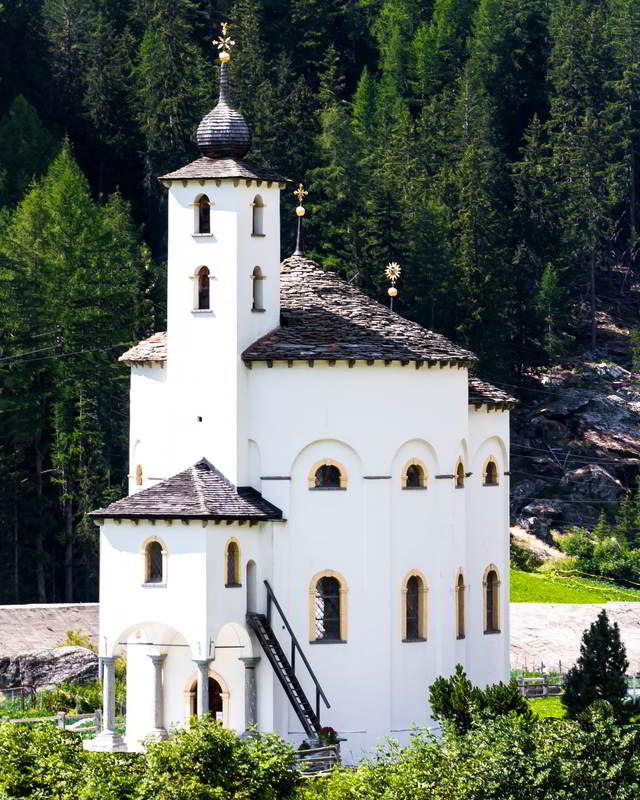
3. The round church in Saas-Balen
The round church Maria Himmelfahrt of Saas-Balen is a very pleasant baroque little church in a very small town in the Saas valley. It was built between 1809 and 1812, and the builder was Johann Josef Andenmatten, a person who was born in the valley. The white church with yellow windows serves as a perfect picture for Instagram.
How to get to the round church in Saas-Balen?
Saas-Balen lies just in front of Saas-Grund when you enter the Saas valley. When you drive from Saas-Grund back to Visp (where you enter the valley) you will quickly spot the round church on the left. There is a big parking spot nearby. The Postbus (free when your accommodation is in the Saas valley) also has a stop on this parking lot.
Photography tip for the round church
- A sunny day in combination with the bright white color of the church makes the ND filter an essential part of your photography material.
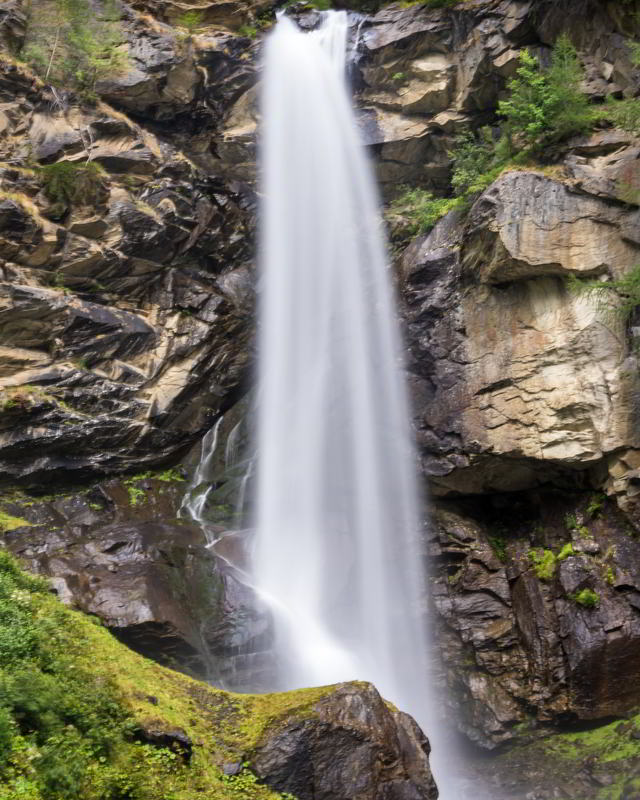
4. The Fellbach in Saas-Balen
The Fellbach is also located in the tiny Saas-Balen village. As soon as you enter the village, it is difficult not to spot the waterfall thundering down from more than 40 meters above. A natural spectacle!
How to get to the Fellbach in Saas-Balen?
When you drive from Saas-Grund back to Visp (where you enter the Saas valley) you will quickly spot a big parking spot when entering Saas-Balen. The Post bus (free when your accommodation is in the Saas valley) also has a stop on this parking lot. On the other side of the road, you will see a street starting to make its way up to the mountain. Just follow that street for 300 meters and you are in front of the waterfall.
Photography tips for framing waterfalls
- A tripod and a long exposure will make your picture more interesting to look at. A ND filter will allow you to use an even longer exposure time during sunny days.
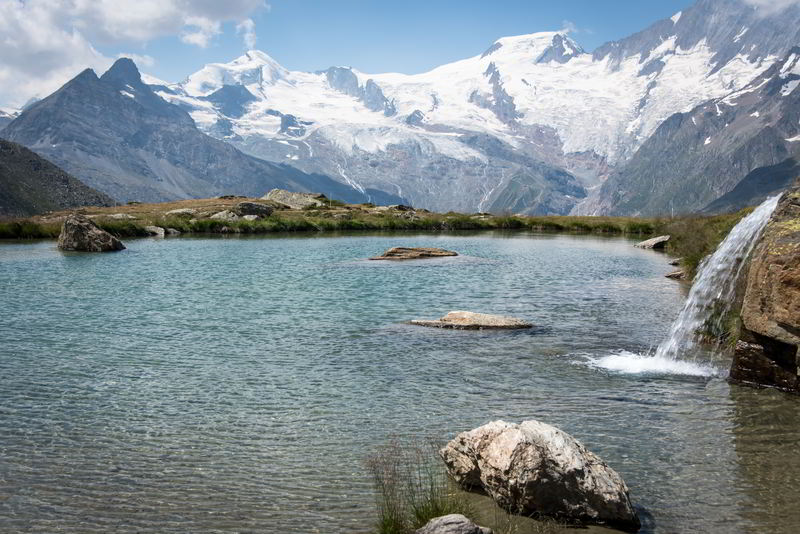
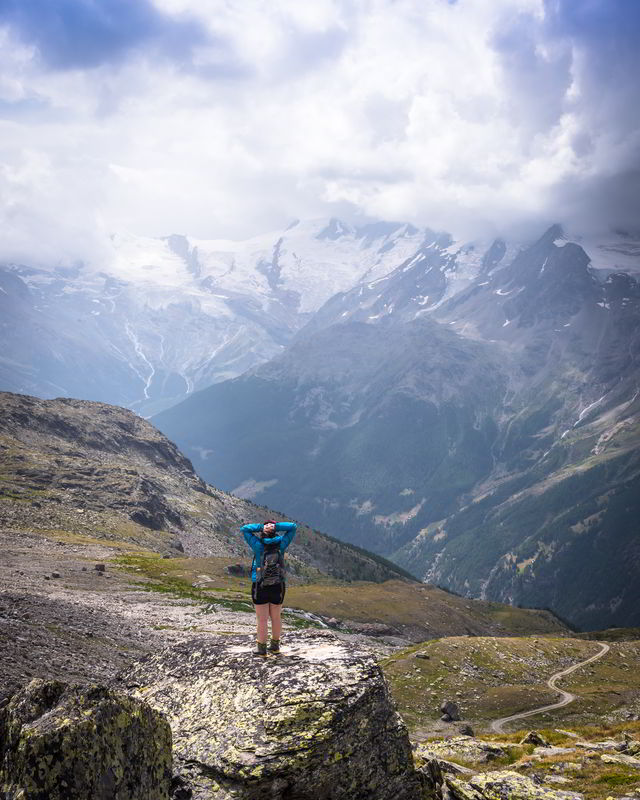
5. The little lake and waterfall at Kreuzboden
When you look at the postcards of the Saas valley, there is one specific photo that is used more than once on different post cards: The Kreuzboden lake with the massive Mischabel range in the background.
How to get to Kreuzboden?
To reach the Kreuzboden lake, there is an easy and a hard way. The hard way is to start in Saas-Grund and hike to Kreuzboden, a walk that takes about 3 hours. However, if you want to save your energy, you can take the cable car to Kreuzboden. All cable cars in the Saas valley are included in the Burgervignette. Take the bus to the Hohsaas cable car in Saas-Grund. Where you have to switch to another cable car, you are at Kreuzboden. Walk past the kids’ playground up to the little lake and find a good spot to take your photo. After this, you can take the other cable car that will take you all the way up to Hohsaas (3101 meters above sea level).
Photography tips for the Kreuzboden lake
- Go early! Kreuzboden is a rather popular place, and many tourists take a picnic alongside the lake. It will also allow you to take your picture in the best lighting circumstances. There are no golden hours in the mountains, so by arriving early, you have lots of time to take your picture in different lights.
More difficult to reach Instagram places
If you are a hiking and photography lover, your choice for the Saas valley was a right one! There are some amazing spots for photography in this valley, but they require some strenuous hiking and sturdy boots. The tourist offices in the Saas valley can give you advice about the hikes and weather conditions. Also take a look at our hiking advice for safe hiking.
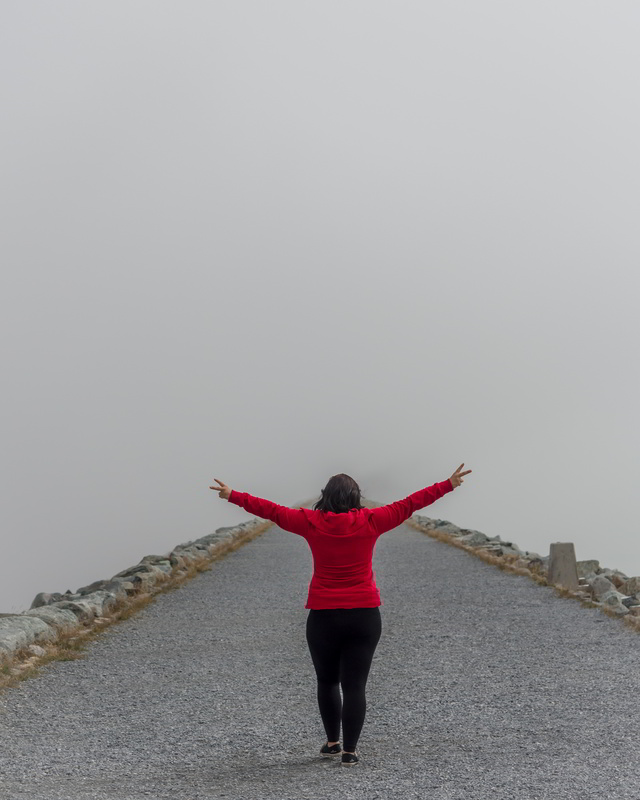
1. The alpine fields when hiking down from Heimischgartu to Saas-Balen
Heimischgartu is a hotel at 2100 meters above sea level and used to be a place where people had a sleep over when hiking the Hohenweg from Gspon to Mattmark. A very nice walk is a round tour Saas-Balen – Heimischgartu – Saas-Balen. This walk takes you along some beautiful mountain views and waterfalls. But especially the alpine fields and colorful flowers are worth a couple of photos.
How to get to Heimischgartu and its alpine fields?
Start hiking the same road as the road that goes up to the Fellbach in Saas-Balen (the road on the opposite of the large parking lot in the village). At the Fellbach, cross the bridge and keep going. During this hike, you’ll see different signs guiding you to Heimischgartu (a hike that takes about one and a half hours). When you arrive at Heimischgartu, go through the village downhill (this road takes you back to Saas-Balen, in a circle). Shortly after the village, you enter these amazing fields with colorful flowers.
Photography tips for alpine fields
- Accentuate the largeness of the fields, for example by placing a person as a subject in your photo. Try to keep in mind the colors of the fields when choosing the right clothing for your subject. Opposite colors work the best, for example red clothing in a green forest, or blue clothing in a field of yellow flowers.

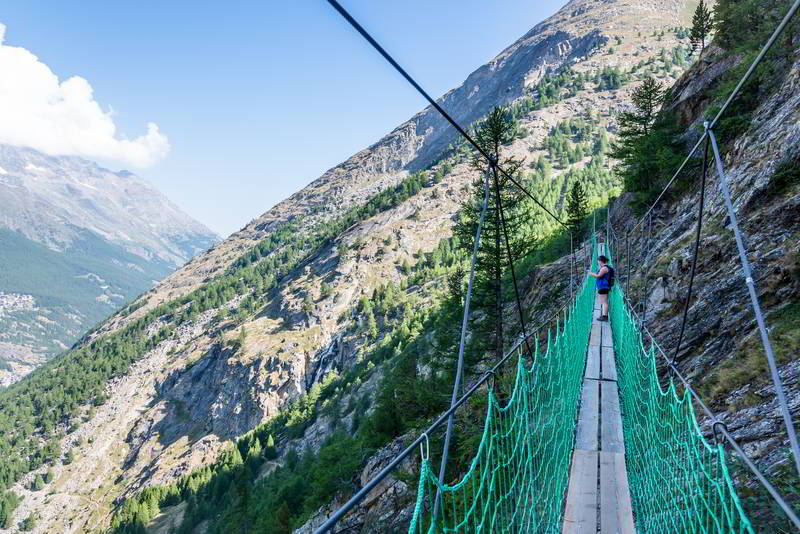
2. The ‘Erlebnis’ hike from Saas-Grund to the Allmageller Alp
Definitely not for the faint hearted, this adventurous hike is full with steps carved into rocks and hanging bridges with magnificent views. Take care of your camera when climbing up and down the many ladders on your way and let the heights not forget you to take many pictures.
How to get to the Erlebnis hike?
Take the cable car in Saas-Almagell to Furgstalden. At the cable car station you can see direction signs showing the way to the Erlebnis hike. The hike is popular amongst hikers, so a good advice is to start early.
Photography tips for the Erlebnis hike
- Always remember the rule of thirds. Imagine breaking an image down into thirds (both horizontally and vertically) so that you have 9 parts. Then place points of interest in the intersections or along the lines, to get a more balanced photo.
- Make sure that lines (for example the lines of the hanging bridge) end in the corner of your photograph. Let’s say the height of this hanging bridge is the reason we didn’t execute this rule very well in our picture 🙂 .
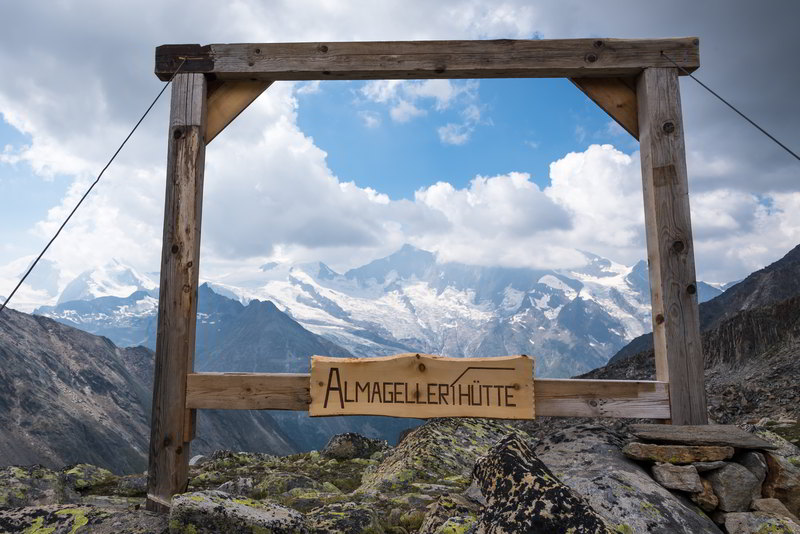
3. The Almageller Hut
It seems like this hike never ends… The road keeps going up and up, until you turn around the corner and you see another mountain to climb. But luckily the views along this hike made the blood, sweat and tears worth it. At the hut, there is even a wooden construction that helps you framing the mountain scenery perfectly.
How to get to the Almageller hut?
First of all, you have to hike to the Almageller Alp. There are several ways to reach the alp. You can start in Saas-Grund and follow the signposts or you can take the Erlebnis hike (see above) and continue your way to the Almageller Hut.
Photography tips for mountain scenery
- Try to be different. Look for a cool perspective or cool elements in the environment that make your picture unique. At the Almageller hut, the wooden construction served as a great framing element in our picture. But also windows or other constructions can be very helpful. That way, your picture is more than just another picture of mountains.
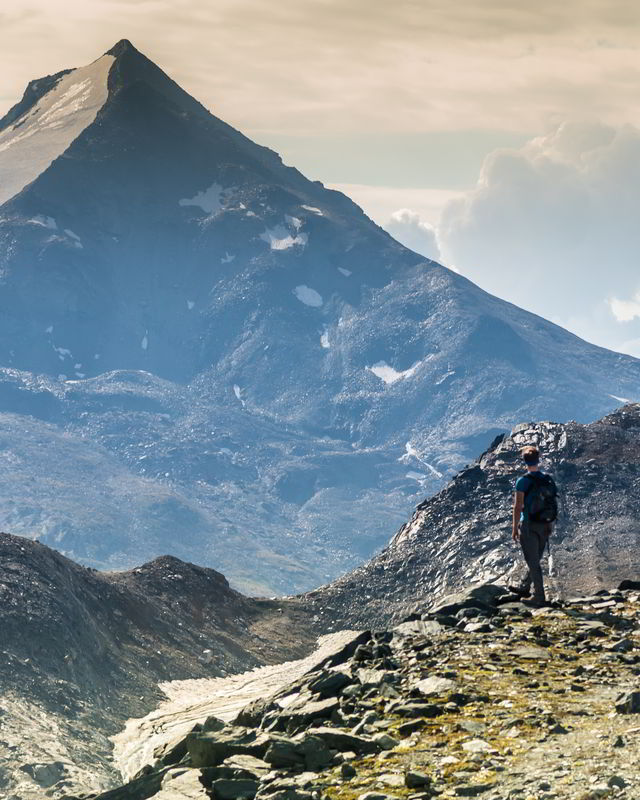
4. To the Gletscherseewjini
Probably the place with the most difficult name in the entire Saas valley, we still don’t know the exact pronunciation. The road is like a 4WD road, which allows you to take a photo where the bends are clearly visible. At the end of the hike, you reach a glacier where the ice ends in a perfect blue lake. If you like mountain biking: we saw a lot of people who used a bike for this hike, and it appeared very doable.
How to get to the Gletscherseewjini?
This hike starts from Heimischgartu (see directions above). From Heimischgartu, start hiking to Gruebenalp. When you reach Gruebenalp, follow the signposts to the Gletscherseewjini. This is a full day hike.
Photography tips for the Gletscherseewjini
- Try to capture different interesting elements in your photo that capture the attention of the viewer. In our picture, Mieke is enjoying the view and draws the attention, while in the meanwhile, the road we hiked is clearly visible and draws the attention as well. Also, we kept in mind the rule of thirds when taking this picture.
A perfect Instagram tour in the Saas valley
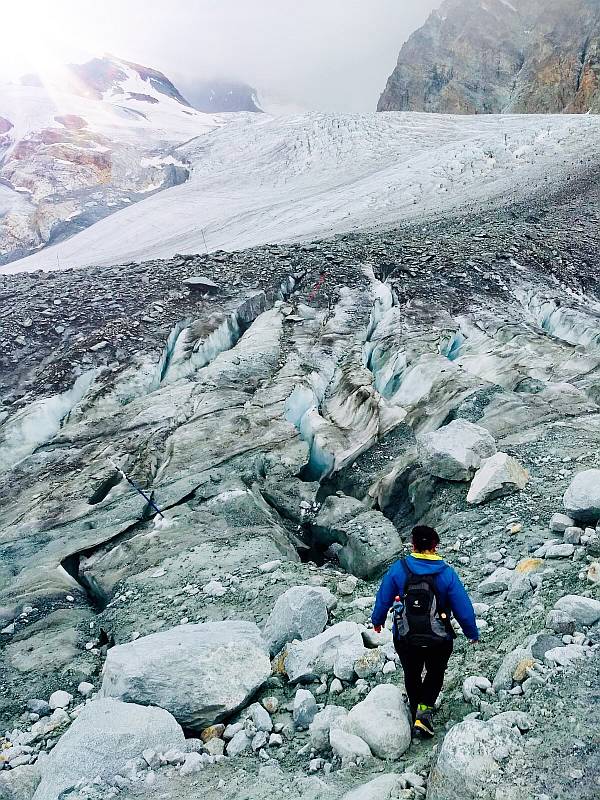
Above, we described several hikes that offered us instagrammable views. However, when undertaking this tour, make sure to take some extra batteries for your camera, because you will shoot a lot of pictures along this hike! Probably one of the most beautiful and awesome hikes we did during our time in the Saas valley. Touch a glacier, admire the Mattmark lake from high above and encounter some ibexes along the road. The glacier trail to the Brittania Hut is the perfect Instagram tour!
Detailed information about this hike
The start of this hike is in Saas-Fee, the village that is called the pearl of the Alps. To save money, take the free bus to Saas-Fee. The village is carless and before entering, you have to leave your car in an expensive parking lot. Also, the hike does not take you back to Saas-Fee but ends at Mattmark. Wander through Saas-Fee and take the Alpin Express cable car to Felskinn (3000 meters above sea level). This cable car is free with the Burgervignette. From Felskinn, start the hike to the Britannia hut. On your way, you will hike next to a glacier lake and cross a glacier until you reach the Britannia Hut. Enjoy the amazing views, take lots a photos and continue your way to the Mattmark lake. During this hike you again have to cross several glaciers until you reach the lake and you can take a bus back.
Photography tips for the glacier trail
- First of all: Start early in the morning. Even though you start at 3000 meters above sea level, the hike takes a full day. If you want to make pictures along the way, make sure you have time to find the perfect angles and framing.
- Get off the beaten path, literally. Please don’t do this on the glaciers, but for safe underground, dare to go more uphill or downhill to take the perfect picture.
- Get inspiration from other photographers: Take a look at the internet or Instagram to see how others have framed places you will visit, or for photography in general.
- And finally, take an additional battery with you.
Some photos we took during this perfect Instagram hike.
We hope you enjoyed reading this post and that we encouraged you to visit the Saas valley in Switzerland. As always, if you have any questions or remarks, send us an email or leave a comment below.
M&M
