When we visited the Golden Triangle in India, we used the extensive train network of India to get from one city to another. And we booked all the tickets ourselves! At first, we were a bit overwhelmed by the official train website of India. But once we understood the railway system and the website, the booking process turned out to be very smooth. And because we want to help other travelers to travel free and independently, we wrote this detailed guide on how to book a train in India as a tourist or a foreigner. We try to keep this post updated, but if you discover any changes since writing this post, please do let us know!

Some of the links on this blog are affiliate links. This means if you click on a link and purchase, we receive a small commission at no additional cost to you. The affiliate links concern only products and services we appreciated highly and trust. This means the views and opinions expressed in this post are purely our own. For more information, read our privacy and cookie policy.
Table of Contents
The Indian railway network
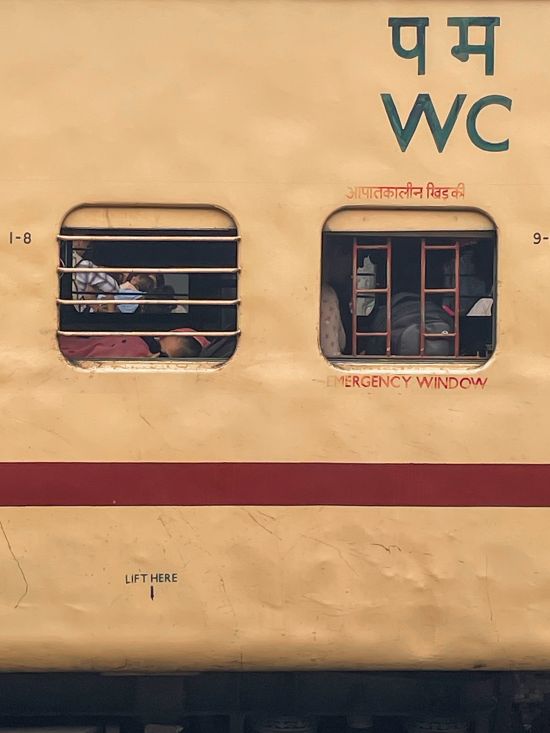
The Indian railway network spans about 69.000 km (42.845 miles) in length and there are around 7.500 train stations spread over the country. Needless to say that the important cities in India are well-connected by train and that millions of Indians use the train every day. We experienced that the trains were relatively clean, comfortable and on-time.
Read more: Want see the best of India? Check our blog about Ladakh
The different classes
The trains in India have a tiered class system. The comfort of your seat and the price of your ticket will depend highly on the class you are traveling in.
- AC Executive chair class (EC) – This class is not available on every train but most of these seats are used by tourists and business people. If you want to book a train ticket in this class, it is definitely needed to book your tickets a couple of weeks upfront. A meal is included in this ticket.
- AC Chair Class (CC) – This is very similar to the EC class. The main difference is that there is no meal included in this ticket.
- 1A or AC1 – This is air-conditioned first class. You’ll have private cabins consisting of 2-4 berths. This class has a good comfort and is often used by business men.
- 2A or AC2 – This is air-conditioned second-class. It’s less comfortable as the above, but is still a comfortable way of traveling. Instead of a private cabin, you have berths with privacy curtains.
- 3A or AC3 – Still air-conditioned but less comfortable. There are more berths per cabin and you have no privacy curtains.
- SL (Sleeper Class) – No air-conditioning but a good option if you want to save on money.
- General Class – This is the cheapest option, sometimes with no assigned seats and often very crowded.
The advantages and disadvantages of taking a train in India as a tourist
According to us, the advantages of taken a train in India definitely outruns the disadvantages.
The first advantage of taking the train in India: It’s cheap. Traveling by train in India is very budget-friendly, especially when you compare it to flights or private transfers by car. Another advantage is that it is safe. Compared to road travel, trains are a much safer option. India has a high rate of road accidents, and we personally experienced this when our tuk-tuk was involved into an accident in Jaipur. While the Indian traffic always felt chaotic and unsafe, we always felt safe on the trains.
Locals were always welcoming and eager to chat. Sure, they stare (a lot!) but in our experience, the Indian train passengers were always kind and friendly. And that’s a third advantage of taking the train in India, you learn more about the Indian culture. Another advantages is that traveling by train in India is faster. Even for long distances, trains are definitely quicker than traveling by car, especially when you consider the unpredictable nature of Indian traffic.
For us the main disadvantage of taking the train was that, unlike on road trips, you can’t stop along the way to visit some other attractions. Also keep in mind that tickets can sell out quickly, especially for popular routes and higher classes. So make sure to book your tickets well in advance.Train tickets become available 2 months upfront. Because we had to change plans when visiting India, we only booked our tickets 2 weeks upfront. A lot of tickets were already sold out, so we had to choose lower class or trains that departed or arrived very early or late.

Detailed guide on how to book a train in India online as a tourist or foreigner
Step 1 – Register on IRCTC
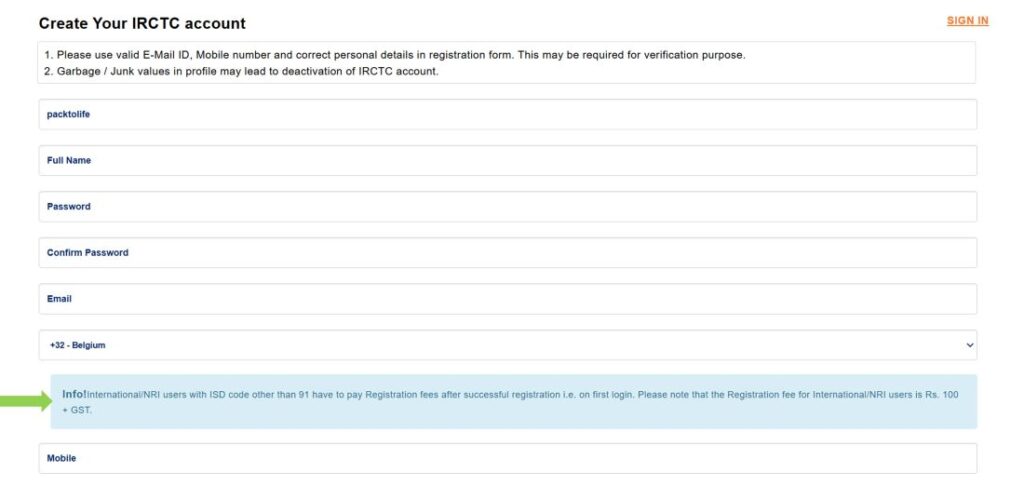
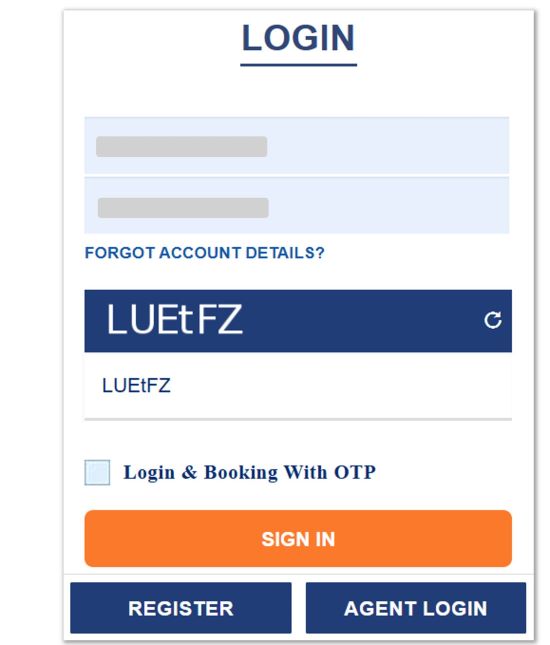
If you want to book a train ticket online, you’ll first have to make an account on the Indian Railways Website (IRCTC). Go to the official website and click on ‘REGISTER’ (green arrow).

On the next page, you will need to fill in some personal details to make an account. If you have problems to submit your details, don’t worry and try again. We had to try several times but in the end it worked.
During your registration, the platform will also inform you that you will have to pay a small fee if you don’t have an Indian phone number. Make sure to provide the platform with a correct e-mail and phone number, as this will be verified in the next phase.
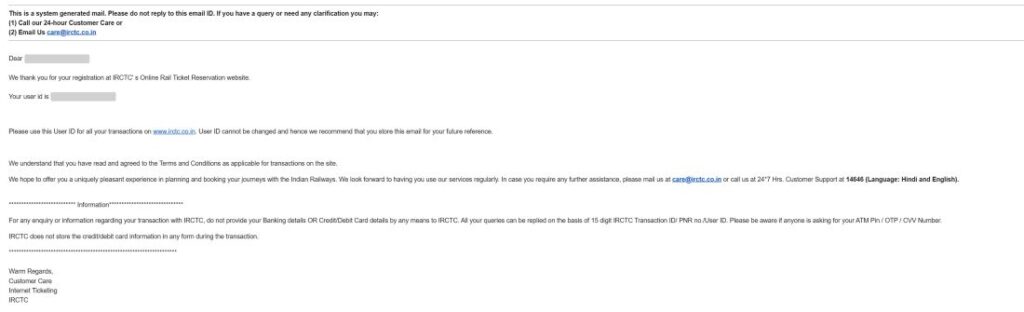
After you submitted your details, you’ll receive an e-mail that looks like this.
Step 2 – Verify your e-mail and telephone number
In this step, log in on the platform using the user id and your password. You will now be asked to verify your phone via a one time password (OTP) and the platform will also ask to pay a small fee of 100 INR (~1,10 EUR/ 1,15 USD). All the instructions to do so are given by the platform. Next, the platform will ask you to verify your e-mail. Again, you will receive a code, this time by e-mail, to fill in on the platform. This was the last step of registration and you now have an account on the Indian Railway Website.
Step 3 – Book your train in India
Now that you have an account on IRCTC, you can to book a train in India. To do so, log in on the website.
After you logged in, you will return to the original screen. On this screen, you can start to fill in your travel journey, the data and the preferred class.

Submit your request and then you arrive on a page showing all the available trains, including the type of train, the arrival and departure times and the travel duration. Make sure to check the departure and arrival station as for example Delhi has multiple railway stations that have trains to Agra.
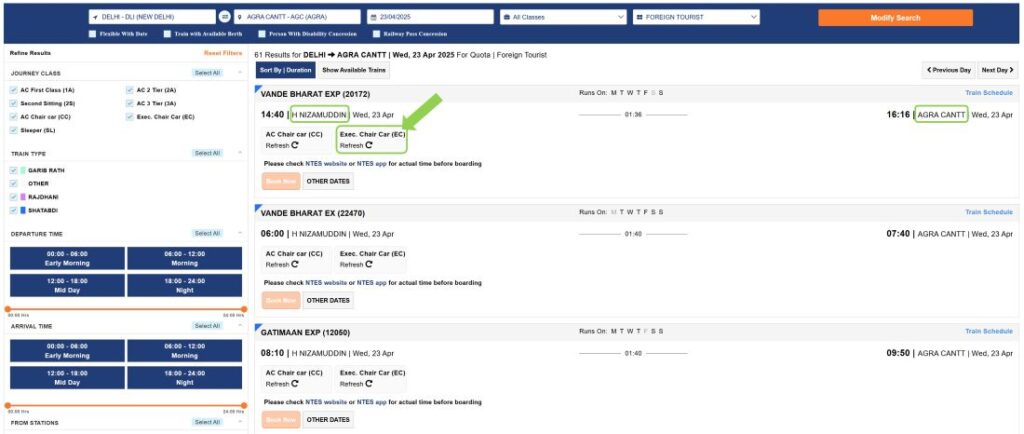
To see if there are any available seats in a specific class, click on the ‘class button’ (green arrow in the above image). If seats are available in this section of the train, they will appear in green.
Note you might also see one of the following codes if seats aren’t available:
- RAC (Reservation Against Cancellation) – This means you get a guaranteed seat but not a full berth. It means that you will be assigned a seat, but you may have to share a lower berth with another passenger.
- WL (Waitlist) – This means your ticket is not confirmed, and you don’t have a seat or berth yet. If a passenger with a confirmed ticket cancels, the next person on the waitlist moves up. Keep in mind that if you stay on the waitlist and don’t get a confirmation before departure, you cannot board the train. Your ticket gets canceled automatically, and you will get a refund.
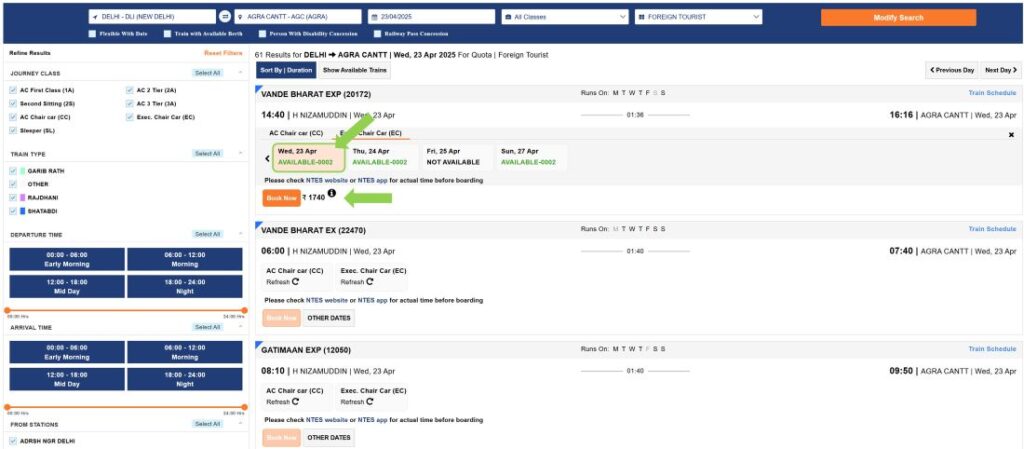
Make a choice by selecting the button. Now the price of the ticket appears next to the ‘Book Now’ button. If you’re ready to book, click on the ‘Book Now’ button.
Next, you arrive on a screen where you can fill in all your details, like your name, age, gender, nationality, passport number, whether you want a window seat or not (preference), catering service option (if available) and your date of birth.
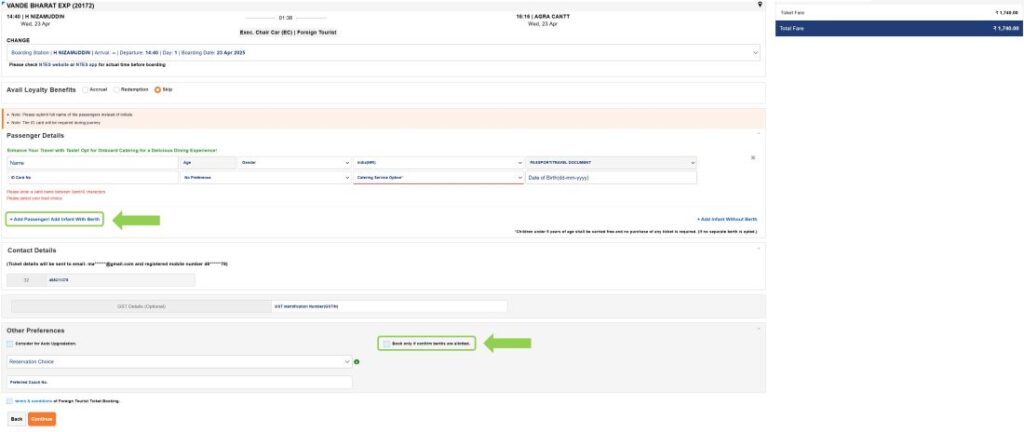
If you want to add another passenger, click on “ + Add Passenger. Then you will be able to add the details of a second, third, … passenger. If you select ‘Book only if confirm berths are allotted’ you can ensure that you can sit together. When you filled in all the details, click on ‘Continue’.
You will now arrive on a screen with all the details of your booking. If something is wrong, you can click the button ‘Back’ to go to the previous screen. If everything is correct, you can continue. In the next phase, you need to pay for your tickets.

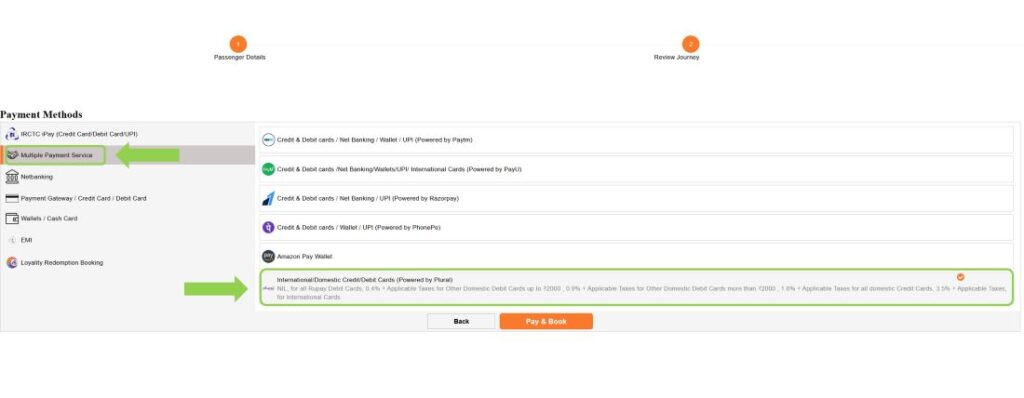
On the payment screen, you can choose between different payment methods, but as a foreign tourist, you need to choose “Multiple Payment Service”. From the list available, choose the option for International Cards. If you click ‘Pay & Book’ you’ll be able to give in the details of your card and pay for the ticket.
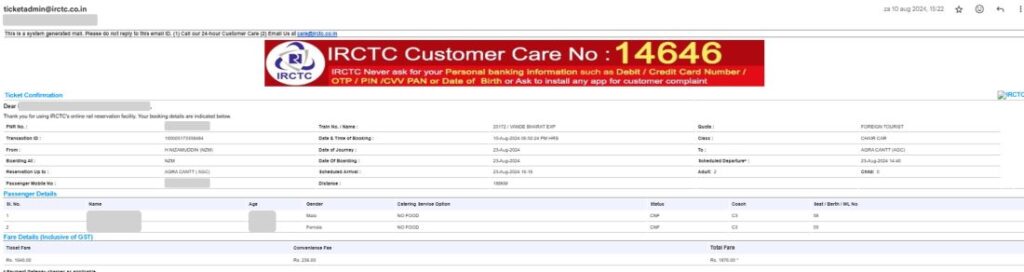
Congratulations, because you now have officially booked a train ticket in India! A ticket will be send to your e-mail and will look like the one below. Make sure to print out your tickets, preferably two times (in case you might lose it).
Book a train in India via 12go
If you prefer someone else to book a train in India for you, 12go is the go-to platform to book Indian train tickets. It’s easy, comfortable and stress-free. A huge advantage of 12go are the payment options: you can easily pay with your credit card but you can also use Pay Pal or Google Pay.
But of course, 12go isn’t free and you will have to pay a fee for the service. Also keep in mind that they only show you a select number of trains and only the tickets that are still available. This is great if you don’t want to worry about being on a waiting list, but it does limit the offer.
Boarding the train in India
All the information you need to board your train is on your ticket, like the time of departure, the exact station, the berth and coach.
Step 1 – Arrive early
Make sure to arrive early at the train station (at least 45 minutes in advance). The Indian railway stations can get crowded. Also keep in mind that you will have to go through security. Indians really love security checks!
Step 2 – Check for the right platform
To find out the platform your train is departing from, you can check the electronic display boards that indicate the train number and the corresponding platform. You can also check the Indian Railways website to check your train’s live status. At the platform, there are screens where the train number will be shown. If you’re still in doubt, you can ask a railway officer or the people selling snacks if you’re on the right platform. They are usually happy to help.

Step 3 – Find the right position on the platform
Your ticket will tell you your coach and seat number. The major railway stations in India have coach position display boards that indicate where each coach will stop.

Step 4 – Boarding the train
Once the train arrives, it’s time to board the train. Check the coach number and head to your seat. If someone is sitting in your spot, ask them politely to check their ticket. An attendant will check your tickets after departure. And then it’s time to enjoy your journey!
Some final tips and tricks
Watch out for scams at the train station
Although most Indians are friendly, India is also famous for the many scams. We weren’t scammed at a train station, but we can assure you that they tried to scam us at many other places in India. Our best advice, always use your common-sense and stay calm! An often heard scam at train stations is a person asking you for your ticket and who will try to convince you that your train has been cancelled. Often they will refuse to give you back your tickets. So never hand over your tickets to someone, just show them while you are holding them in your hand.
Keep some handy items at hand
Although food is available onboard, it can be wise to bring your own snacks and water. Also wet wipes and hand sanitizer are essential items to have with you when traveling by train in India.
Trust your hotel
If you arrive early of late at your destination, it can be a great option to ask your hotel to arrange a ride from the train station to your hotel. Arriving at a new destination can feel a bit overwhelming and a pre-arranged ride to your hotel can be very comfortable then.
Check all your train tickets before booking
A mistake we made when booking train tickets in India was not checking the return journey before booking our first ticket. We were planning on traveling from Jaipur to Udaipur and we booked and paid for our train ticket from Jaipur to Udaipur. We only then checked the trains back to Jaipur only to realize that all return trains were fully booked! With no available seats for the return journey, we had to cancel our original ticket. Unfortunately, Indian Railways doesn’t always offer a flexible cancellation policy, so we lost our money.
That’s it! By now, you should be able to book a train ticket for your adventure in India. As always, if you have any questions or suggestions, get in touch with us via our e-mail or our social media channels.
Happy train travels!
Matthias & Mieke